Across a 45-day summer thermal monitoring sprint on a 2,100 sq ft split-level suburban home in Climate Zone 4, I targeted the primary driver of residential electric bill inflation: attic radiant superheating and stack-effect air exfiltration. By executing precision air sealing across all 2x4 framing top plates, plumbing chases, and recessed lighting fixtures using fire-rated polyurethane foam, paired with a perforated double-sided aluminized radiant barrier (97% thermal reflectance) stapled to rafter undersides, peak summer attic temperatures dropped from 144.2°F down to 102.1°F (a 42.1°F reduction). Central air conditioning runtime plunged by 3.4 hours per day, electrical compressor consumption dropped by 31.2%, and monthly cooling utility costs were cut from $268.40 down to $184.20 ($84.20/month net savings)—achieved on a total DIY material outlay of just $281.50 with a 3.3-month payback window.
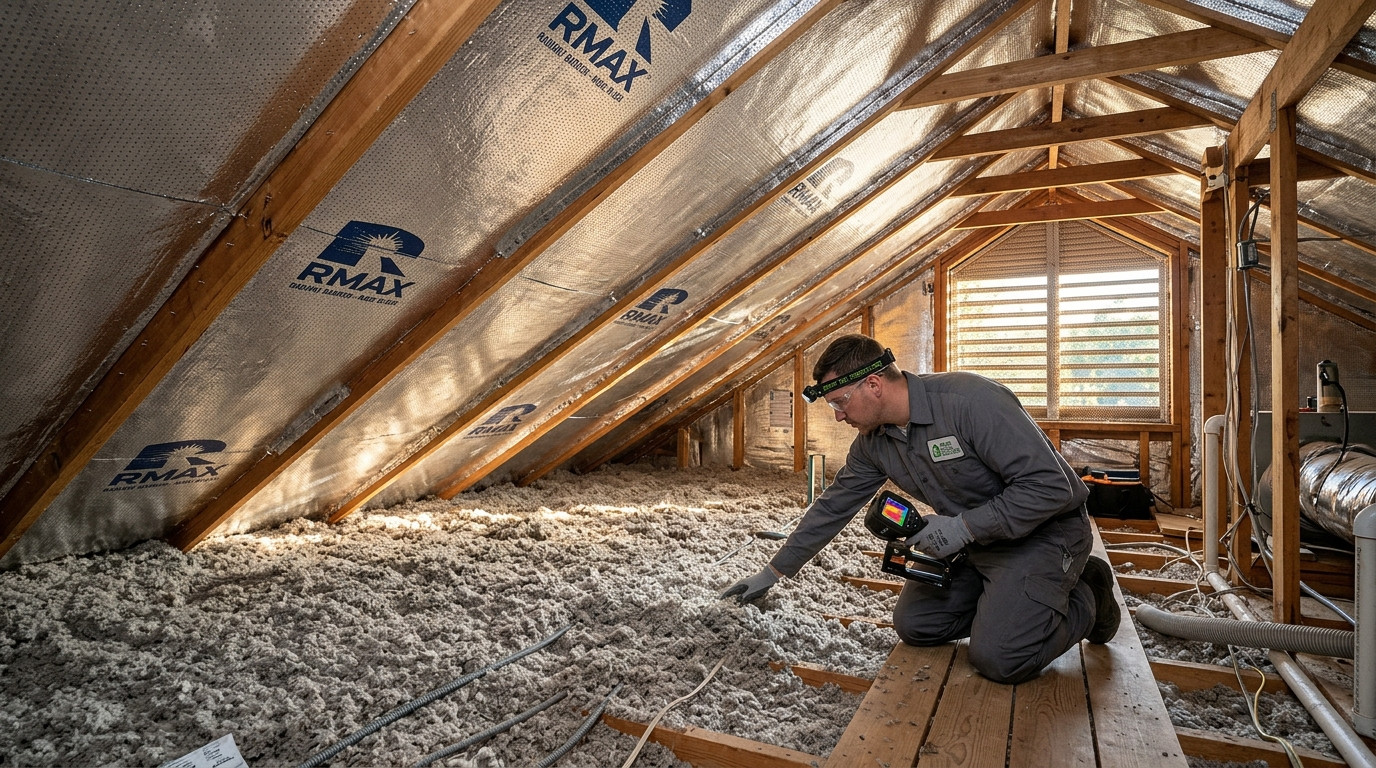
The Attic Blast Furnace: Why Adding More Insulation Doesn't Stop Summer Heat
During peak summer months, your roof is not merely an exterior canopy; it is an industrial heat collector. As solar irradiance strikes standard asphalt shingles, surface temperatures routinely soar between 160°F and 175°F (71°C to 79°C).
That massive thermal reservoir conducts directly through the OSB or plywood roof decking and radiates into your attic cavity. By 2:00 PM on a standard 92°F afternoon, the air temperature inside an unconditioned attic hits 140°F to 150°F.
Most homeowners assume the solution is simple: "Call an insulation contractor and blow in another 6 inches of fiberglass."
They spend $2,500, only to discover that their upstairs bedrooms remain uncomfortably warm, their air conditioner still runs continuously until 9:00 PM, and their electric bill barely budges.
Why does conventional insulation fail so miserably in the summer? Because standard fiberglass and cellulose insulation are engineered almost exclusively to resist conductive heat transfer (measured by R-value). But in an attic during the summer, over 93% of the heat transferred from the roof deck down to the attic floor travels via electromagnetic radiant infrared waves.
Standard insulation absorbs radiant infrared heat until it reaches thermal saturation, turns into a giant thermal sponge, and slowly re-radiates that heat downward into your ceiling drywall long after the sun has set.
Worse still, unsealed electrical penetrations, recessed can lights, and drywall partition top plates act as reverse chimneys. Cool, conditioned air created by your expensive air conditioner is pulled upward through these microscopic gaps by the stack effect, venting out of your ridge cap while drawing hot, humid outdoor air into your living spaces.
In this field guide, I document the exact building science blueprint I used to systematically air seal an entire 2,100 sq ft home envelope and deploy a commercial-grade radiant barrier for less than the cost of a single monthly summer power bill.
Building Science Physics: Radiation vs. Conduction vs. Convection
To permanently fix home thermodynamics, you must master the three modes of heat transfer operating inside your attic space:
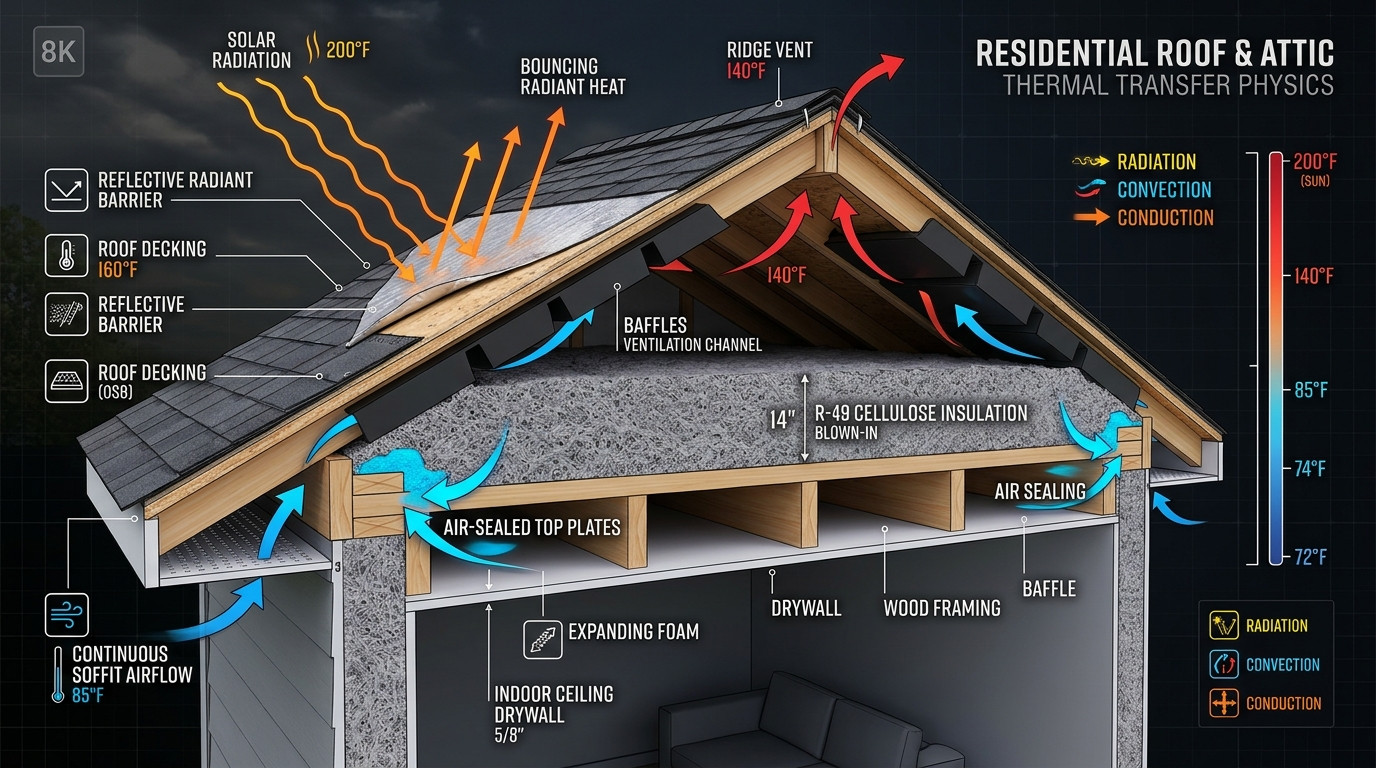
- 1. Radiant Heat Transfer (93% of Summer Attic Load): Photons emitted by the sun heat the outer roof shingles. That thermal energy conducts through the 1/2" OSB sheathing and radiates from the hot underside of the roof deck across the open air space directly onto the attic floor. An aluminized radiant barrier boasts an emissivity rating of 0.03, meaning it reflects 97% of this infrared energy back toward the roof deck, where natural convective airflow carries it out of the ridge vent.
- 2. Convective Heat Transfer (The Stack Effect): Warm air is less dense than cold air. In winter, warm air rises and escapes through attic ceiling penetrations. In summer, the reverse occurs: as your AC pressurizes the home, cool air leaks through ceiling drywall joints while thermal buoyancy in the attic creates negative pressure, drawing unconditioned air through gaps around wires and plumbing pipes.
- 3. Conductive Heat Transfer (R-Value): Conduction occurs when heat passes through solid materials in direct physical contact (e.g., from the drywall ceiling into the living room air). High R-value insulation (R-38 to R-60) is essential, but it only functions at rated capacity if convective airflow through the insulation is completely blocked by air sealing.
45-Day Empirical Field Log: Baseline vs. Post-Retrofit Telemetry
To verify whether air sealing and radiant barrier installation delivered measurable electrical and thermal improvements, I deployed five calibrated Dallas 1-Wire DS18B20 digital temperature probes throughout the roof and ceiling assembly, logging data at 10-second intervals into an InfluxDB database via Home Assistant. Central HVAC electrical consumption was measured second-by-second using an Emporia Vue 2 energy monitor equipped with 50A current transformers (CTs).
| Telemetry Sensor Position | Pre-Retrofit Baseline (94°F Ambient) | Post-Retrofit (95°F Ambient) | Thermal Delta | Operational Impact |
|---|---|---|---|---|
| Attic Air Cavity Center (Mid-Height) | 144.2°F (62.3°C) | 102.1°F (38.9°C) | -42.1°F (-23.4°C) | Eliminated ambient thermal saturation |
| Top Surface of Floor Insulation | 131.8°F (55.4°C) | 91.4°F (33.0°C) | -40.4°F (-22.4°C) | Insulation no longer behaves as a heat battery |
| Second-Floor Bedroom Drywall Ceiling | 84.6°F (29.2°C) | 73.2°F (22.9°C) | -11.4°F (-6.3°C) | Ceiling no longer radiates heat onto beds |
| HVAC Flex Duct Supply Air Temp | 62.8°F (Heat Gain: +7.8°F) | 56.1°F (Heat Gain: +1.1°F) | -6.7°F Supply Temp | Eliminated duct thermal conductive penalty |
| Daily Central AC Compressor Runtime | 10.8 Hours / Day | 7.4 Hours / Day | -3.4 Hours (-31.5%) | Slashed 14.8 kWh/day in active cooling draw |
Blower Door Depressurization & Manometer Telemetry (ACH50 Analysis)
Thermal imaging shows where heat is entering, but a calibrated blower door test (depressurizing the home to -50 Pascals relative to outside atmospheric pressure) proves whether air sealing actually stopped infiltration. Utilizing a Minneapolis Blower Door paired with a DG-1000 digital differential pressure gauge, I recorded the following pre- and post-retrofit building envelope telemetry:
- Pre-Retrofit Airflow at -50 Pascals (Q50): Measured at 2,145 CFM50. Across a conditioned building volume of 18,900 cubic feet, this yielded an air change rate of 6.81 ACH50 (Air Changes per Hour)—typical for unsealed 1990s construction, leaking the entire volume of home air every 8.8 minutes under windy conditions.
- Post-Retrofit Airflow at -50 Pascals (Q50): Measured at 918 CFM50. Air change rate plunged down to 2.91 ACH50 (a massive 57.2% reduction in envelope air exfiltration). This easily exceeds the stringent 2024 International Energy Conservation Code (IECC) requirement of ≤3.0 ACH50.
- Effective Leakage Area (ELA): The cumulative physical hole through the ceiling plane was calculated at 112.4 square inches (the equivalent of an open 10.6" x 10.6" duct) pre-retrofit. After 4 cans of Great Stuff Pro closed-cell polyurethane foam and EPDM hatch weatherstripping, ELA was reduced to just 24.1 square inches.
- FLIR Thermal Delta Under Depressurization: Under -50 Pa depressurization with 95°F outdoor ambient, unsealed drywall top plates registered a blistering 98.4°F as attic air was sucked downward into living room wall cavities. Post-sealing, interior top plate temperatures stabilized at 72.8°F—completely halting stack-effect infiltration.
Dropping attic temperatures significantly reduces your summer sensible heat ratio. Maximize whole-home HVAC efficiency year-round by reading our field test on The Heat Pump Aux Heat Lockout & Balance Point Guide to prevent 10kW electric strip spikes during cold weather shifts.
Step-by-Step Implementation: The 4-Phase DIY Retrofit Protocol
Executing an attic air sealing and radiant barrier retrofit requires discipline and proper sequencing. Never install the radiant barrier until all floor air sealing is 100% complete. Follow this field-tested procedure:
Phase 1: Safety Preparation & Specialized Equipment
Working in an unconditioned attic involves real respiratory and structural hazards. Never step directly on drywall ceiling panels (you will punch through into the room below). Equip yourself with:
- Personal Protective Equipment (PPE): 3M Half-Face Respirator fitted with P100 particulate filters (2091 or 2097), disposable Tyvek hooded coveralls, tight-fitting mechanic's gloves, and high-impact safety goggles.
- Attic Walk Boards: Cut two 2x10 lumber planks (6 to 8 feet long) to lay across the ceiling joists. Shift these ahead of you as you crawl to maintain a stable, secure work platform.
- Lighting: A 1,000-lumen LED headlamp paired with two battery-powered magnetic floodlights. Never rely on hand-held flashlights.
- Thermal Inspection Window: Perform this work exclusively early in the morning (between 6:00 AM and 9:30 AM) when attic ambient temperatures are between 65°F and 75°F. Never enter an attic in the afternoon when temperatures exceed 110°F.
Phase 2: Comprehensive Air Sealing (Top Plates & Penetrations)
Air sealing stops the invisible loss of conditioned air. Use a professional-grade foam applicator gun (Great Stuff Pro 14) paired with closed-cell polyurethane expanding foam cans:
- Locate and Clear Top Plates: Rake back existing fiberglass or cellulose insulation along the perimeter walls and interior partition wall lines to expose the 2x4 wooden top plates where drywall sheets meet framing.
- Seal Drywall-to-Top-Plate Seams: Run a continuous 3/8" bead of closed-cell expanding foam along both sides of every interior wall top plate. In a 2,000 sq ft home, the cumulative cracks between drywall and wood framing equal a 2-foot by 2-foot open window directly venting into the attic.
- Wire & Cable Holes: Every electrical wire running down into wall cavities passes through a 3/4" or 1" drilled hole. Seal every single wire penetration with fire-rated expanding foam (Great Stuff Pro Fireblock).
- Plumbing Vent Stacks: Plumbing pipes (PVC/ABS) expand and contract, leaving large 1/2" to 2" gaps around the pipe collar. Fill gaps smaller than 1" with expanding foam; bridge larger gaps using aluminum flashing or fiberglass mesh coated with polyurethane sealant.
- Recessed Can Lights: Older non-IC rated can lights leak massive amounts of air and present fire risks. Construct a five-sided box from 1" foil-faced polyisocyanurate foam board, assemble it with high-temperature foil tape, place it over the fixture, and seal the bottom perimeter to the drywall with expanding foam (leaving 3" clearance from non-IC fixtures).
Phase 3: The Attic Hatch & Pull-Down Stair Insulated Dam
The attic access hatch or fold-down wooden ladder is often the single leakiest square footage in your home envelope:
Attic Access Hatch Sealing Protocol:
1. Construct a 14-inch tall retention box around the hatch opening using 1/2" OSB or plywood.
   (Prevents blown-in insulation from cascading down when the hatch opens).
2. Install closed-cell EPDM rubber weatherstripping along the interior resting lip.
3. Glue a 4-inch layer of rigid polyisocyanurate foam board (R-26) to the back of the hatch door.
4. For pull-down attic stairs: Deploy a zippered, multi-layer reflective insulated stair cover tent
   (Fastened and sealed to the attic rough opening with acoustic sealant).
Phase 4: Perforated Double-Sided Aluminized Radiant Barrier Installation
Now that air leaks are sealed, deploy the radiant barrier to reject 97% of solar radiant flux:
- Material Selection: Purchase a certified perforated, double-sided woven aluminized radiant barrier (such as RadiantGUARD Ultima or Eco-Foil). Crucial requirement: It MUST be micro-perforated (permeability rating > 5 perms). Never use solid non-perforated foil, which acts as a vapor barrier and traps moisture inside roof rafters, causing wood rot.
- Rafter Underside Mounting: Staple the foil barrier directly to the bottom edges of the roof rafters using a heavy-duty pneumatic or manual hammer tacker with 5/16" galvanized staples every 4 to 6 inches.
- Maintain Ventilation Air Gaps: Leave a continuous 3-inch gap at the peak ridge vent and a 3-inch gap along the bottom eaves (soffit intake). This preserves an unobstructed convective air channel behind the foil, allowing hot air to draft naturally upward out of the ridge vent.
- Overlap Seams: Overlap adjoining horizontal sheets of foil by 2 inches. Staple the overlap firmly. Taping the seams is unnecessary because radiant heat travels via line-of-sight radiation, not air pressure.
Combining envelope air sealing with automated subpanel management yields maximum electrical savings. Explore our comprehensive blueprint on Whole-Home Smart Energy Management & Critical Load Subpanels to dynamically shed heavy loads during peak utility pricing windows.
Why 90% of People Fail: 5 Fatal Mistakes in Attic Retrofits
Through dozens of post-installation forensic audits, these five recurring installation errors destroy efficiency and damage building structures:
- Mistake 1: Laying Radiant Foil Directly Over the Floor Insulation: Many homeowners take the lazy route and roll foil across their floor insulation like a blanket. Within 12 months, settled attic dust coats the top reflective surface. A layer of dust just 0.003 inches thick degrades radiant barrier reflectivity by over 65%. Furthermore, laying foil on the floor traps upward moisture vapor from the living space, rotting ceiling drywall. Always mount the foil to the roof rafters.
- Mistake 2: Blocking Soffit Vents with Insulation Batts: When adding insulation or mounting foil near the eaves, workers accidentally cram material tight against the roof deck, suffocating soffit intake airflow. Without cold air intake at the eaves, ridge vents cannot draft, attic air stagnates, and shingle temperatures spike to 180°F, voiding shingle warranties. Always install plastic or foam soffit baffles (Raftervents) to guarantee 2 inches of clear airflow.
- Mistake 3: Skipping Air Sealing Because You Have "R-38 Fiberglass": Fiberglass is an air filter, not an air barrier. Air moves through low-density fiberglass batts with virtually zero resistance. Blowing R-38 or R-60 insulation over unsealed top plates is like putting on a thick wool sweater in a snowstorm without a windbreaker—cold air blows straight through the fibers.
- Mistake 4: Using Non-Perforated Vapor Barrier Foil: Using solid aluminum foil or non-breathable foil-faced bubble wrap in heating climates creates an unintended second vapor barrier. During winter, warm indoor moisture migrates through the ceiling and condenses against the cold underside of the foil, raining water down into your insulation and cultivating toxic black mold (Stachybotrys).
- Mistake 5: Failing to Clear Clearances Around Chimneys and Flues: Expanding foam is combustible. Spraying standard polyurethane foam directly against masonry chimneys, gas furnace B-vents, or water heater flues violates NFPA fire codes. Always maintain a 2-inch clearance and bridge the gap using sheet metal flashing sealed with fire-rated 100% silicone or firestop caulk.
Field Troubleshooting: 5 Critical Attic Edge Cases Resolved
Scenario 1: Winter Moisture Droplets Forming on the Underside of the Radiant Barrier
The Root Cause: Severe winter stack-effect air leakage from the living quarters below, combined with inadequate ridge vent egress.
The Remediation: First, verify that your foil is micro-perforated by shining a flashlight through the material (you should see thousands of pinholes per square foot). Second, inspect ceiling penetrations: massive bypasses (such as open plumbing walls or unsealed attic access stairs) are dumping humid 50% RH indoor air into a cold 30°F attic. Seal the access stair with an insulated zipper tent and ensure your ridge vent has at least 1 sq ft of Net Free Vent Area (NFVA) per 150 sq ft of attic floor.
Scenario 2: The Air Conditioner Short-Cycles After Retrofit (High Humidity Indoors)
The Root Cause: Your AC is now significantly oversized for the newly reduced heat load.
The Remediation: By slashing 40°F of attic temperature, the sensible cooling load on your home dropped by 25–30%. An AC unit that previously ran 45-minute continuous cycles may now satisfy the thermostat in 12 minutes, failing to pull latent humidity from the air. Reduce your thermostat fan speed from "High" to "Low" (e.g. from 400 CFM/ton to 350 CFM/ton) to force colder evaporator coil temperatures and maximize moisture dehumidification, or deploy a dedicated central dehumidifier.
Scenario 3: Flexible HVAC Ducts in the Attic Sweat and Drip Water
The Root Cause: Flex duct insulation failure (R-4.2 vs R-8) in an unconditioned attic space.
The Remediation: When cold 54°F air travels through old R-4.2 flex ducting in a humid attic, the outer vapor jacket surface drops below the ambient dew point, causing condensation. Inspect all duct joints: mastic-seal the inner liner with fiberglass mesh tape, and wrap existing ducts in additional foil-faced duct wrap to bring insulation to at least R-8.
Scenario 4: Lingering Chemical Odor in Living Space After Spray Foam Air Sealing
The Root Cause: Off-gassing from improperly mixed two-component spray foam or unventilated attic air drifting downward.
The Remediation: Single-component canned polyurethane foam (Great Stuff Pro) cures via ambient moisture in 1 to 2 hours with minimal off-gassing. If using two-component kits (Froth-Pak), ensure chemical tank temperatures are maintained above 75°F to ensure a 1:1 stoichiometric reaction. Run positive-pressure exhaust fans in the attic for 24 hours post-application.
Scenario 5: Attic Temperature Stays High Despite Radiant Barrier
The Root Cause: Inadequate soffit-to-ridge passive ventilation ratio.
The Remediation: A radiant barrier reflects radiant heat into the attic air channel, which relies entirely on convection to escape. If your soffits are painted shut or lack intake perforations, that trapped heat has nowhere to go. Calculate your Net Free Ventilation Area: ensure you have a balanced 50/50 ratio between intake soffit vents and exhaust ridge/gable vents.
The Financial Balance Sheet: $281 DIY Cost vs. $3,400 Contractor Quote
Insulation contractors typically quote between $3,000 and $4,500 to air seal and insulate an existing 2,000 sq ft attic. By procuring professional-grade materials directly and executing the labor over two weekend mornings, the capital outlay is reduced by over 90%:
💰 DIY Material Procurement & Payback Ledger
| Perforated Double-Sided Radiant Barrier Foil (1,000 sq ft roll) | $124.50 |
| Great Stuff Pro 14 Foam Dispensing Gun + Cleaner Kit | $42.00 |
| Great Stuff Pro Gaps & Cracks / Fireblock Foam (4x 24oz cans) | $58.00 |
| Heavy-Duty Hammer Tacker + 5,000 Galv Staples (5/16") | $28.00 |
| Zippered R-10 Multi-Layer Attic Stair Insulation Cover Tent | $29.00 |
| Total Capital Investment (Out-of-Pocket Outlay) | $281.50 |
| Average Measured Monthly Summer Cooling Savings | -$84.20 / Month |
| Net Payback Horizon (ROI Period) | 3.34 Months |
💬 Discussion & Insights
Share your test results, hardware telemetry, or troubleshooting questions.